Just downloaded your printable and not sure what’s the best way to print it? This post will cover all the details on how to print your printable without wasting time, ink, and paper.
Whether you’ve just downloaded a free printable or purchased one, printables are the new way of using “printed goods” that you traditionally buy at a brick and mortar. When you sign up or purchase a printable, it is an instant download with no shipping time.
There are so many different printables out there and with all of the printable creators (like me), you have way more styles and designs to select from when you’re putting your printed item together. Printables are way more economical than a book or planner you would buy at the store.
Printables are made available for an affordable price or even for free! You can search online and places like Pinterest for free or paid printables. Just type in the item you are looking for with the word “printables” behind it and voila!
Once you have a printable, it is yours to print for personal use, over and over again! You can print them to the sizes you want, as many as you want, and which pages. Think about the awesome binder, notebook, etc. you can make that works perfectly for you!
Let’s dive into how to print your printables!
Some of the links in this post are affiliate links. This means if you click on the link and purchase the item, I will receive an affiliate commission at no extra cost to you. All opinions remain my own.
WHAT'S IN THIS POST?
How to Print Your Printables
In this section, I’ll cover how to print your printables and provide you with screenshots for every step of the way.
The provided examples will be for printables that I carry in my store. However, the same principles may apply to anything you want to print. Keep in mind that your printed product colors may vary from pictures you see on your phone and computer due to varying color profiles, ink quality, paper, etc.
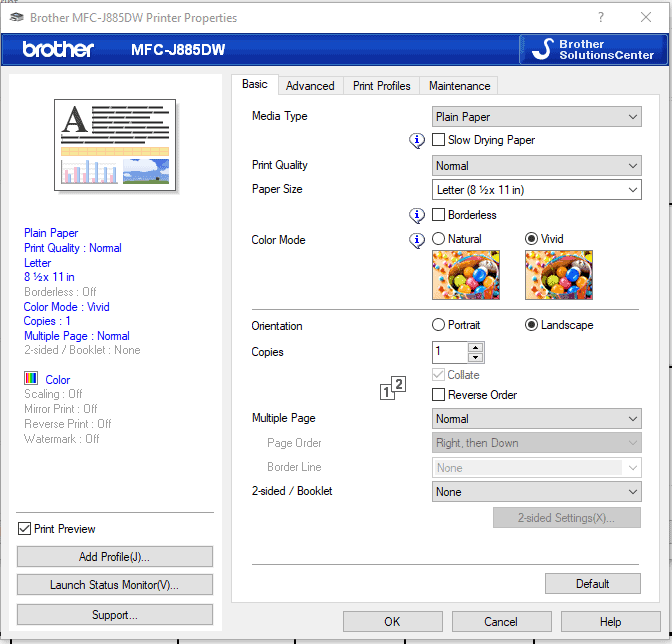
Depending on your printer, the print options may vary from what I have. If you check your printer manufacturer guides, you may find the settings there. Manufacturer’s may use different terminology or placement of their settings.
Make sure your printer has the appropriate and up-to-date drivers from your manufacturer’s website.

I am using a Brother WorkSmart Series MFC-J885DW Printer.
Related Post: Printables 101: What Are They & Why You Should Use Them
Before Printing your Printable
Before you print your printable, you need to go through the pages to figure out the following:
- Which pages do you want to print?
- What order do you want the pages to appear?
- Which pages will be single sided? Which will be double sided?
- Are there pages that will be borderless?
The guidance below will cover the different elements of printing and you will have to determine which elements are right for you.
Printing Certain Pages
Another benefit of printables is the ability to customize your binder or notebook with the pages you need. When you download a printable, you may not need all of the pages that are included.
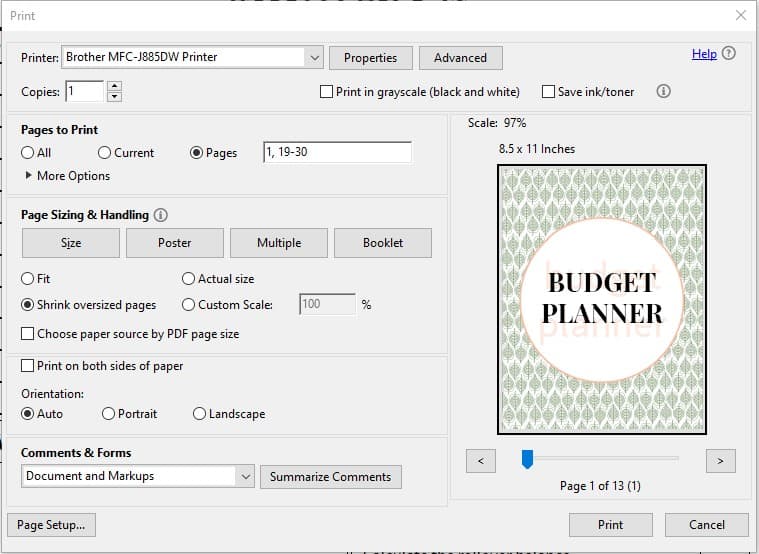
In my Budget Planner, I offer a few variations of the same type of page because I want to offer flexibility in use. In the printer settings, you can print certain pages of a document.
I suggest printing in small batches at a time to make sure the correct pages are printed and to always preview your pages before hitting Print.
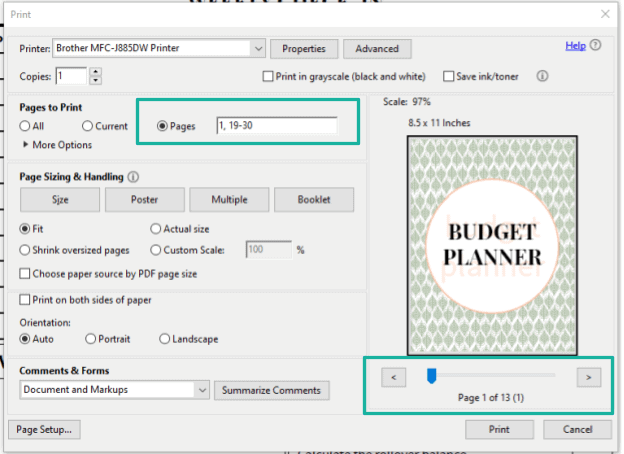
- Go through the document and identify the pages that you want to print.
Make sure you are looking at the document page number and not the typed page number. The document page number is the number of the page order while the typed page number is what the author may have provided somewhere on the actual page itself.
For the Budget Planner, there are no typed page numbers since I create printables that are customizable. However, I will show you where to find the document number of a PDF.

- After you record your document page numbers, open the print settings; File > Print.

- Under the Pages to Print section of the print window, select Pages and enter the page numbers.
In the 109-page Budget Planner, I have chosen pages 42, 79, 77, 83, and 89.
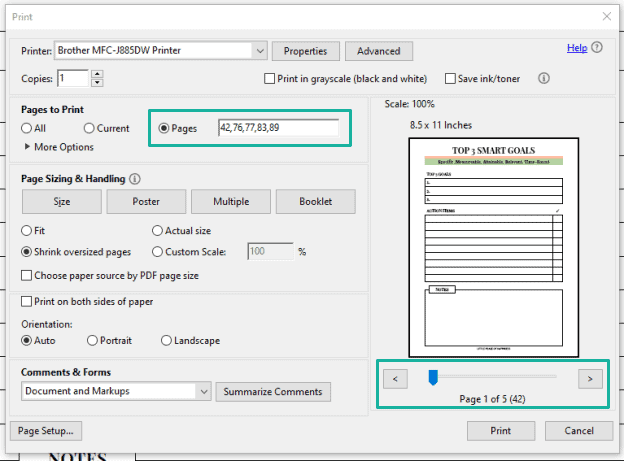
- If you are happy with your other print settings, click Print.
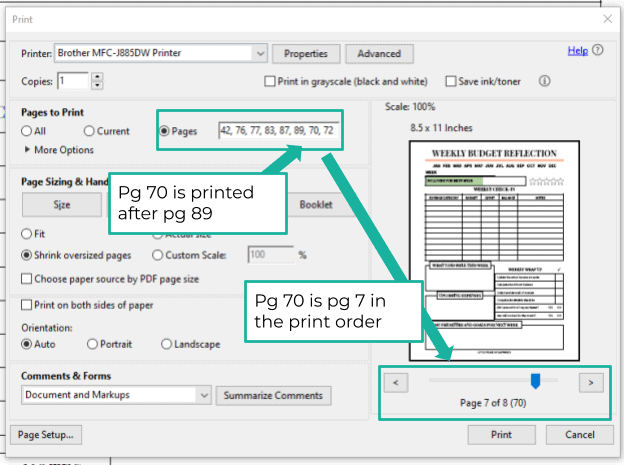
Reordering your Pages for Print
In your document, you may want a page that appears later in the set to be printed earlier and vise versa. Doing this makes more sense if you are printing double-sided (Duplex printing). For Single-sided, you can just print the pages you want and reorder them after they’re printed.
In your printer settings, you can actually tell your printer the exact pages and in the exact order that you want it in. This can be done regardless of what order they appear in your PDF document.
- Open your PDF document and identify the pages (read Printing Certain Pages above) and the order that you want them to appear.
- Go File > Print
- Enter in the document page numbers in the order that you want in the Pages to Print section.
- Review your pages in the preview window. The original document page number will appear next to the page order that will be printed.
- When you are ready, click Print.
Related Post: Printables 101: What Are They & Why You Should Use Them
Duplex or Double-Sided Printing
Printing your printable double-sided is a great way to save paper and to reduce the size of your final printed product.
When printing double-sided, you want to consider the quality and weight (thickness) of your paper. If your paper is too thin, the printer ink may show through the page. Likewise, if you write in pen or marker, the ink may bleed through as well.
Printing double-sided is very easy to do and requires a simple checkbox. By default, your printer settings may or may not have this option selected. You can set your default settings by going into the printer settings in the computer (not from the document).
For duplex or double-sided printing, you will of course need at least two pages that you want to print.
- In the Print Window, locate the option to Print on both sides of paper or Duplex printing.
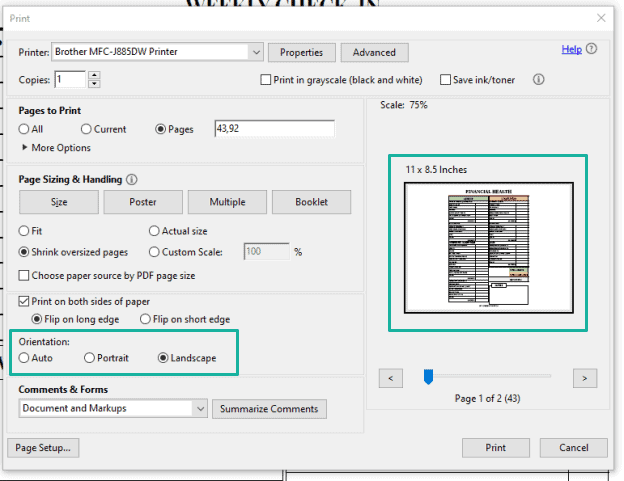
- Choose if you want the page to Flip on long edge or Flip on short edge. To determine this, imagine the page is printed and you are looking at it in the upright position. Now imagine turning it over. Did you flip it on the long edge or the short edge of the document?
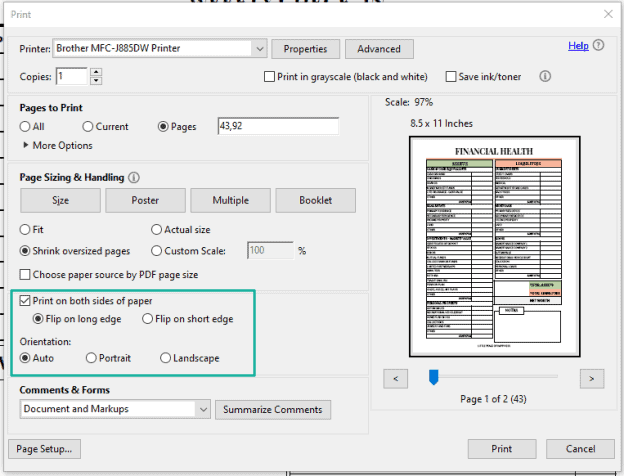
- Select the Orientation. By default, the printer will select Auto. The original orientation of the page can be different from what you prefer the orientation to be. The orientation of the printed document may also affect the way the page is flipped (long or short edge).
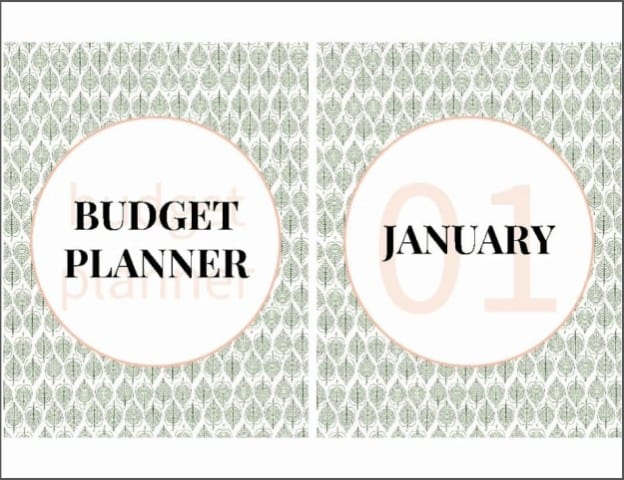
In the provided example, the original orientation of the Financial Health page of the Budget Planner is portrait and I’ve selected the Orientation to be printed in Landscape. Notice how the image is centered on the landscape orientation.
Remember, you can always preview your pages before printing them out in your preview area of your print window.
- When you’re ready, click Print.
Printing a Single Set with Multiples of the Same Page
If you’re printing Duplex or Double-Sided (previous section), you may want to print the same page (like a notes page) to be printed multiple times in the same set of pages. This is different from printing multiple copies of the same page.
Any page numbers listed within the Pages is part of a single set.
For the Budget Planner example, I want to print a month of budget sheets that will include (1) Goal Page, (2) Notes Pages, (1) 2-page spread monthly calendar, (1) Budget Tracker, and (4) sets of Expense Trackers and Weekly Reflections.
In this section, I will only go over a single set of the same pages. I will cover printing multiple sets of the same pages in the next section.
To print multiple pages of a page within a single set, just type in the page number for as many times as you want them to appear, then click Print.
In my example below, I want the notes page (document page #92) to be the second and third page of my double-sided print.
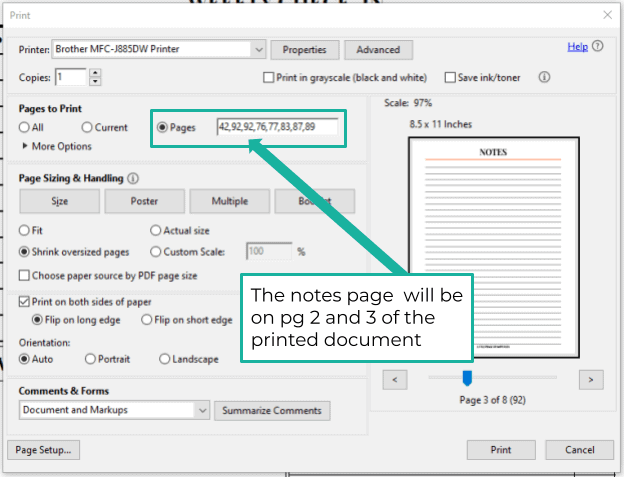
When printing double-sided it will look like this:

Printing Multiple Copies of the Same Set Pages
Printing multiple sets of the same pages is easier than printing a single set with the same pages This is just the simple use of Copies.
To add on to my previous example in the Single Set of the Same Pages section, I want to print four copies of the Expense Tracker and Weekly Budget Reflection.
Locate the field for Copies and type in the number of copies for the pages you want, then click Print.
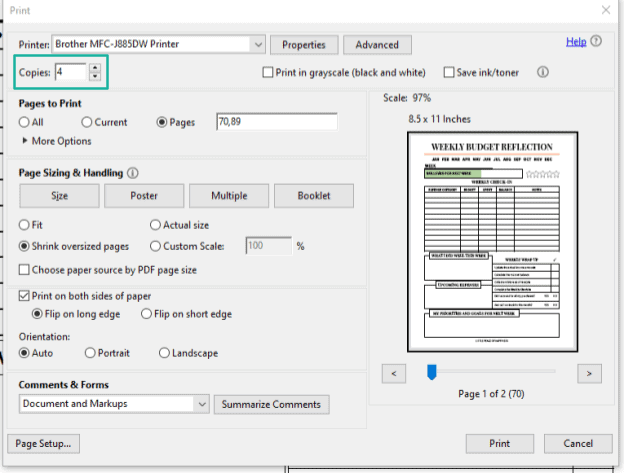
When printing double-sided it will look like this:

Printing Borderless Pages
Borderless printing is when you want to print the full width of the page. By default, your printer may not print borderless and will print with a thin border around the edge of your document.
You may want to print borderless when you are printing a binder cover or section divider.
As an example, the LPH budget planner has a cover page and section dividers with a design that fits the full page and if I don’t want the design to be “framed” with a thin border, then I need to print borderless.
- Go to File > Print to open your print settings
- Locate the Borderless option. If it does not appear on the first window, you may have to go further into your Properties and/or Advanced settings.
- Select the radio button or click the dropdown to turn the Borderless feature on.
- Click Ok

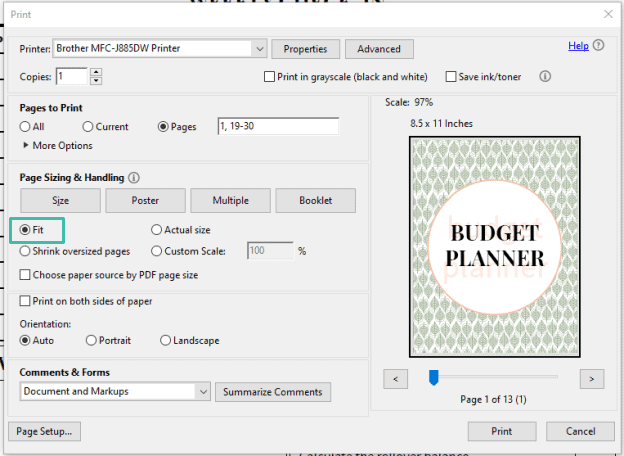
- After the Borderless feature is selection, make sure the Page Size is set to Fit.
- Before clicking Print, make sure you have selected the appropriate pages that you want to print. You may not need to print all of your pages at this setting and only selected pages, such as the cover and divider pages.
For the Budget Planner, I only want to print the front and month covers and I want them to be single sided.
- When you are done previewing the pages that you want to print and you are happy with the settings, click Print.
Related Post: Printables 101: What Are They & Why You Should Use Them
Pin Me for Later!
Printing Sizes
If you’ve downloaded a printable that is too large or small for your intended purpose, you can actually resize it to the size you need in your printer settings.
Keep in mind that although you can print a document to a certain size, the aspect ratio and resolution of the original file may not be able to fit within the entire space and will be adjusted by the printer.
There are two areas that control the page and print size of your document
- Page Sizing and Handling
- Properties
When you’re in a document, in the first print window you may be given some options for Page Sizing and Handling. This area of the print window will allow you to customize the page size and scale being printed on the paper size that is selected.
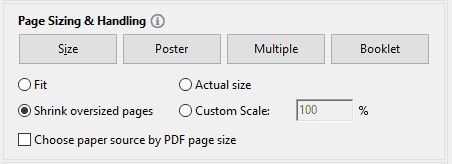
The Page Sizing and Handling area is not the same as your paper size, just the size of the document that will be printed. For adjusting the paper size, you will need to go into the printer setting Properties from the printer window.
Printing US Letter Size to A4 Size Paper
Depending on what part of the world you’re from, a full-size paper can be a US Letter (8.5” x 11”) or A4 (8.25” x 11.75”).
If you want to use an A4 binder, you may want to adjust your printer settings if your printable is not the correct size. It is very easy to print a US Letter size to A4 Size if you know where to look in your settings.
In my store, I offer both sizes for my customers. However, the majority of the printables I create will be US Letter size.
If you are trying to print A4 to a US Letter to fit in a 8.5” x 11” Binder, the guidance will be the same. Just select the appropriate page size as instructed.
- From the main print window, click Properties.
- In the Basic Tab, you will have the option for Paper Size.
- Select A4 paper size from the dropdown menu and click OK.
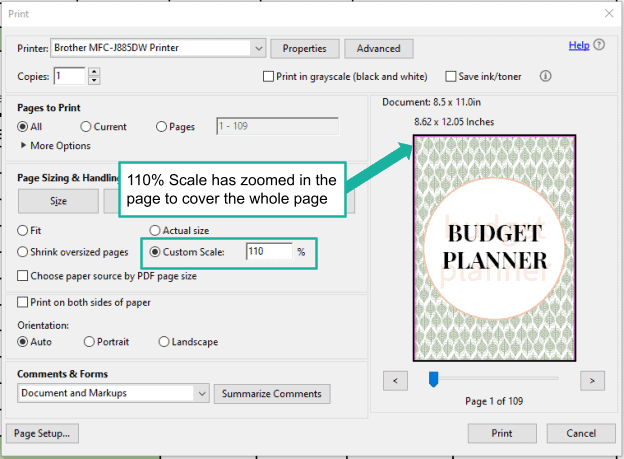
- Next, you need to preview your document in the provided preview window. Because the A4 long edge is larger than the US Letter, there may be some space on those sides. The short edge is also smaller; therefore, it may be scaled accordingly.
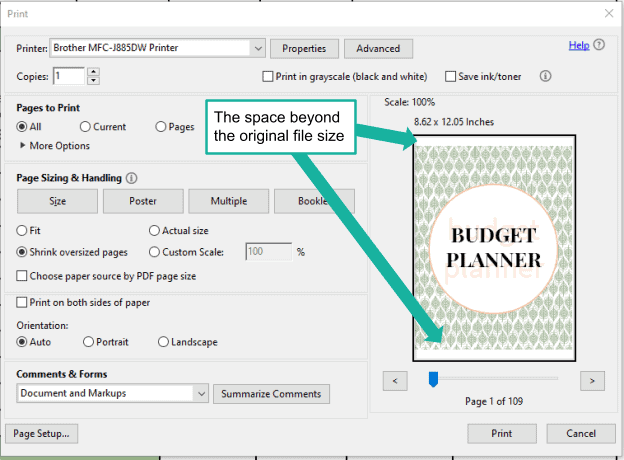
- Before scaling the document for print, review the pages in the preview window because not all of the pages may need to be scaled, if the space difference is not visible. When you are ready, click Print.
In the provided example, I show the front cover of the Budget Planner that I want to print Borderless (see previous section). But for the other pages, I am fine with the vertical space difference because it is just white. Decide on your scaling (how zoomed in or out) preference.
Half-Size
If you are creating a mini binder that fits half-size of a US Letter (8.5” x 5.5”), I’ll go over how you can turn your full size printable into half-size. There are two methods in how this can be done in your printer settings.
In both methods, you are setting how many document pages you want printed on a single sheet. Another way to think about it is how many times the printed sheet is divided. The settings will divide a single sheet into however many sections and print a document page to fit within those sections.

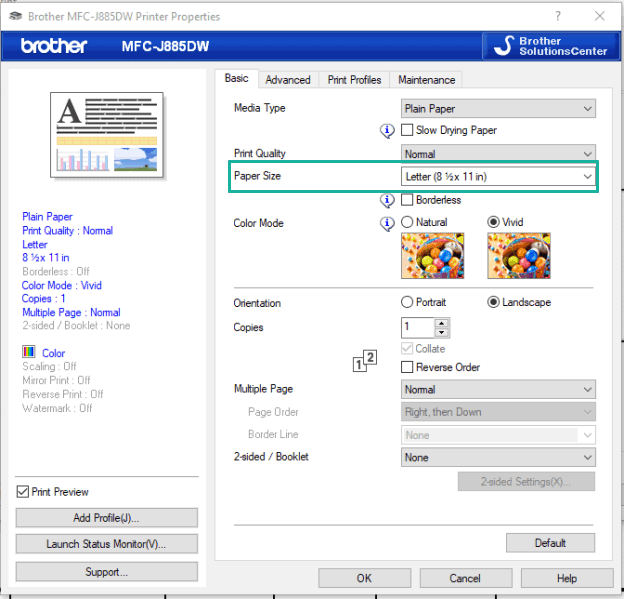
METHOD 1: 2 IN 1 FROM PRINTER PROPERTIES (RECOMMENDED)
This setting is actually one that I used all the time in college when I was trying to maximize the space of my notes. Going through the Printer Properties instead of using the Multiple setting on the main printer window will give you larger content on your page.
NOTE: If you have Borderless checked, the options below will not be selective.
- From the first main print window, click Properties.
- In the Printer Properties window, go to Multiple Page.
- Multiple Page > Dropdown > click 2 in 1.
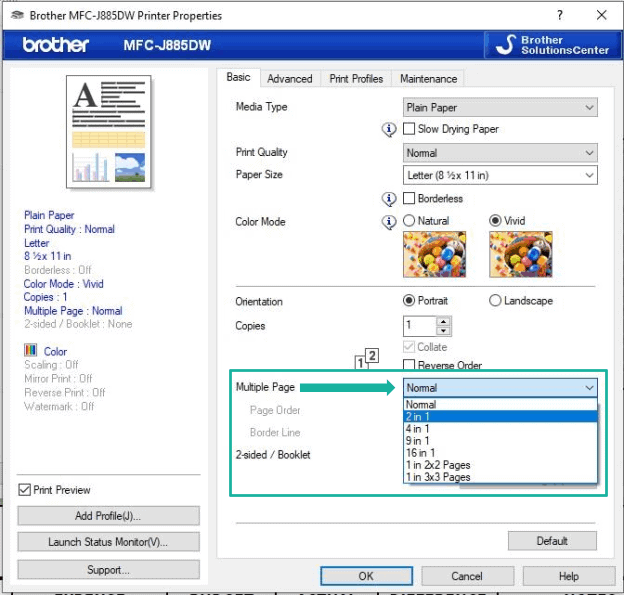
- This setting will give you two pages on one sheet. If you only have one page that you want at half size, you will still select this setting.
- Adjust the Page Order as desired. In my example, I have it as Left to Right.
- Set the Border Line, if you would like. I did not want them to print on my pages because I wanted a clean look.
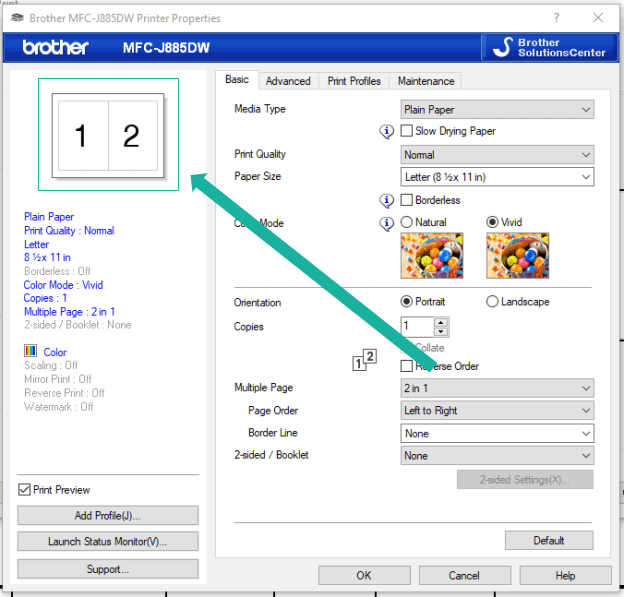
- After you set the Printer Properties, you will not see the correct preview in the main print window. If you would like a final Print Preview before printing, you can select that option in the Printer Properties.
- Here’s a screenshot of the Print Preview with the selected options.
Related Post: Printables 101: What Are They & Why You Should Use Them
METHOD 2: PAGE SIZE & HANDLING – MULTIPLE
An alternative method you can print a half-size page or two document pages on one sheet is directly from the first main print window.
- On the main print window, click Multiple.
- From the Pages per sheet dropdown, select 2. This setting will give you two pages on one sheet. If you only have one page that you want at half size, you will still select this setting.
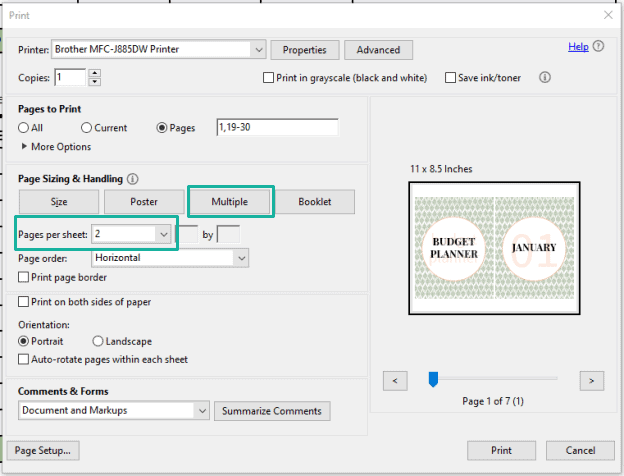
- If you select Custom, that will give you the same results if you enter 2 by 1; however, you may have to play with the Orientation. This will make you do more work, but I wanted to mention it in case you’re wondering how the Custom setting worked.
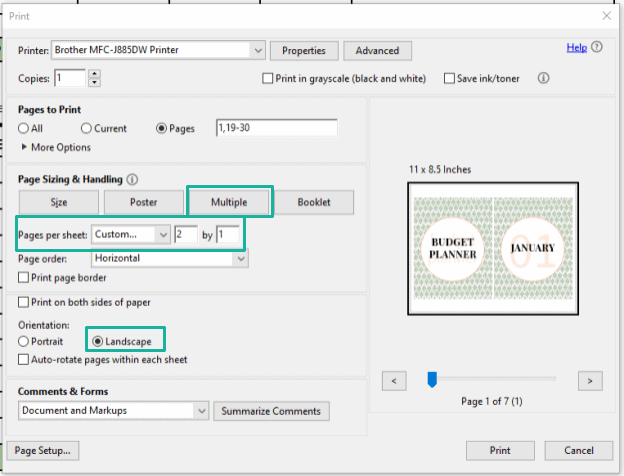
- You can alter the order by playing with Page order.
- If you want a thin border around each document page on your sheet, you can check the Print page border.
- Unlike the settings in the Printer Properties Method, this method will allow you to see the correct preview in the main print window.
Custom Page Size
For all other print sizes that I have not discussed, you can still print your printable to any size you want.
Remember that the amount of coverage the document can fit on your custom size by default may be dependent on the aspect ratio of the original document. This can be adjusted by playing with the scaling features on the main print window in the Page Sizing and Handling area under Size.
- From the main print window, go to Printer Properties.
- Locate the Paper Size dropdown menu.
- From the Paper Size dropdown, select any of the listed pages. For this guidance, I’ll select User Defined. Depending on your printer, it could be called “custom” or something of that nature.
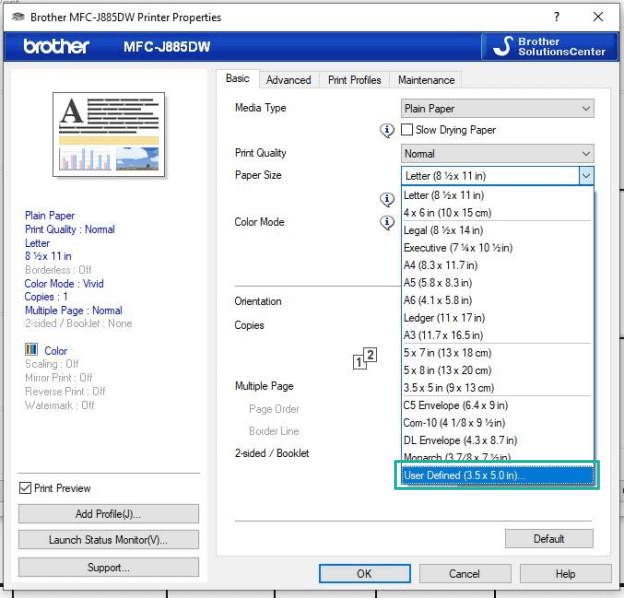
- This will open a new window where you can define the custom size. Enter your custom sizes in mm or inch and click OK.
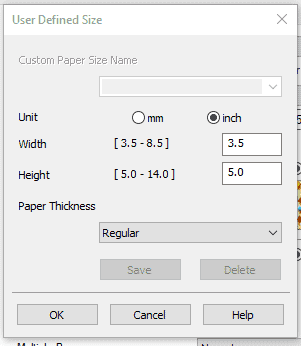
- You will be brought to the main print window and notice that the scale has been changed and your custom size is shown above the preview window.
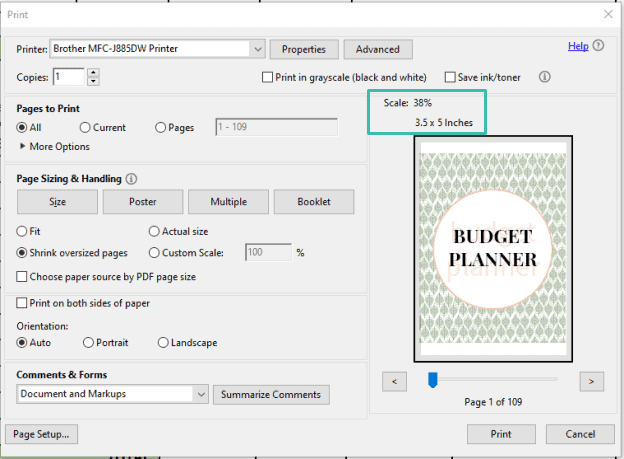
- If there is any visible difference in the surrounding margins, resulting from the original document with a design spanning the full height and width, you may need to adjust the Custom Scale until it fits within your custom page.
I discuss this and provide screenshots in a previous section; Printing US Letter Document to A4 Size Paper.
- When you are happy with your print settings, click Print.
Wrapping Up
Wooo, that was a long one! If you’ve made it to the end, you are now an expert at printing your printables. You have the knowledge to print your document any which way you like. You know how to print certain pages, reorder your print pages, print double-sided, borderless printing, and print different sizes.
You are a master printer and even if you’re not printing a “printable” the information in this post can apply to anything that you are printing.
If you missed the part about what printer I am using for my screen shots, I am using a Brother WorkSmart Series MFC-J885DW Printer. For my examples, I am using my Budget Planner that I created and you can even buy in my store!
Related Post: Printables 101: What Are They & Why You Should Use Them
Sending you a Little Peace of Happiness,

If you’re interested in the Budget Planner, it has 80+ pages to help you manage your finances, get out of debt, and plan for your financial freedom.
What’s included in the Budget Planner?
- Cover Page
- Monthly Dividers
- Other Section Dividers
- Financial SMART Goals
- Past Spending Worksheet
- Bill Trackers and Checklists
- Debt Summary, Strategy, and Repayment Progress
- Savings Summary, Strategy, and Savings Progress
- Budget Self-Reflections for the Week, Month, and Year
- Annual Calendars
- Monthly Calendars
- Budget Trackers and Planning
- Cash Envelope Breakdown
- Weekly Check-In
- Expense Trackers
- Blank Notes Page
- Grocery Shopping List and Budget
- Lots of Expense Trackers for your life and home (income tracker, investments, giving and donations, gifts and holidays, health expenses, emergency savings, home maintenance, and auto maintenance)
- 52-Week Challenge (Pre-filled and Blank)
- Debt and Savings Money Coloring Sheets and Graphs
Pin Me for Later!